First up, we did some painting and replaced some of the old 1970s molding with newly stained cedar in the living room and dining room. (Okay, it’s actually advertised as cedar fencing at the home improvement store but it works and looks great.) There’s still a lot more to do from there. Then she told me what she had in mind for a sliding barn door. Now that was a fun project!

 There are also a couple of decorative wood projects sprinkled throughout the house. She tells me what she wants and I do my best to deliver. One of them sits just above the front door. Measuring about two and a half feet in length and nine inches tall, the style is simple as is the look. I made it out of wood gathered from the family farm in southern Utah, created a frame and she painted it all.
Another project took quite a bit more precise work and a bit more improvisation, too. Basically, Lori wanted what looks to be a giant quilt square but she wanted it made out of wood. The goal was to hang it outside on our shed framed by a number of old tools my Holyoak ancestors used in the past. I came up with some measurements, created a pattern, bought some wood, got out the chop saw and got to work.


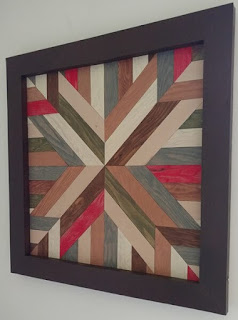 Measuring 27” x 27” and sitting within a homemade frame, it came together well. She then painted each individual piece to make it look like, well, a giant quilt square. In fact, it came out so well we just couldn’t hang it outside. It had to be inside. We found a place in the living room.


 Measuring 27” x 27” and sitting within a homemade frame, it came together well. She then painted each individual piece to make it look like, well, a giant quilt square. In fact, it came out so well we just couldn’t hang it outside. It had to be inside. We found a place in the living room.
And then there's the makeover of a small bathroom located behind the kitchen. I went to town on a pallet-finding mission, loaded up my pickup with pallets twice and returned home with them. After using a sawzall to cut off the nails, we were ready to begin the transformation. I then did the measuring and sawing, and Lori did the layout. It was a fun, fun project to do together. Well, using a nail gun to put up the back wall was fun. I had some frustrating issues with the new plumbing after removing the old sink and replacing it with a new vanity, but in the end it looks great now.
 |
| Before After |

Up next, we’re revamping what was a cramped, dark coat closet into something more open, visual and functional. Further down the road, we hope to replace the flooring and eventually (gasp) rip out and totally redo the kitchen. Until then, we’ll keep taking baby steps.
